Previous Topic

Next Topic

Book Contents

Book Index

Using Output Size Compensation

Output Size Compensation allows you to measure slight variations in output size and compensate for them.

You must set up Output Size Compensation separately for each output device setup. Output size compensation does not affect the size of the job as it appears in the Job Properties dialog.

  1. Click the setup menu button and select Output Size Compensation.

  2. If you are using a hybrid device and want to apply Output Size Compensation to the device's cut output as well as its printed output, check Compensate cut size.

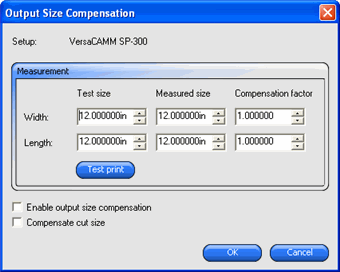
    If you turn this option on, the Test print button will change to Test cut.

  3. Enter the Width and Length of the test print you want to output under Test size.

    For best results, the print should be as large as possible while still fitting onto the output media.

  4. Click Test Print.
  5. Measure the actual size of the test print and enter the Width and Length of the test print under Measured size.

    The software automatically calculates the compensation factors that will scale the output size to compensate for the difference between the test size and the measured size.

  6. Check Enable output size compensation to automatically scale all future output from this setup using the compensation factors derived from your measurements.
  7. Click OK.

See Also

Working with Output Device Setups

Adding New Setups

Selecting a Setup

Activating Setups

Deleting Setups

Editing Setup Properties

Changing Port Settings

Working with Output Validation