![]()
![]()
![]()
![]()
|
|
|
|
|
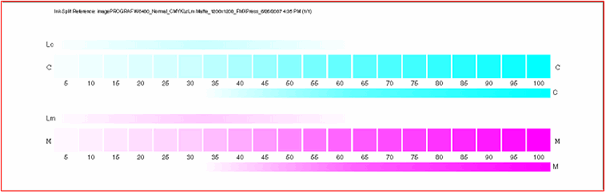
The Ink Split dialog allows you to set the points at which light or medium colored inks will be used instead of normal "dark" inks. This provides a greater number of light-colored shades, and reduces banding in light-colored areas. Ink split is only used when a color mode that includes light such as CMYKLcLm is selected.
Each shade of ink is represented by a curve plotted on the chart. The chart illustrates the amount of each shade of ink that will be output in order to provide a certain amount of coverage. The range of coverage that can be specified in the image (0% to 100%) is plotted on the X-axis, and the corresponding coverage of each shade of ink is plotted on the Y-axis.

Look at the critical area where both inks are used. This can be seen on the Ink Split Test where the swatch increments have color bars above and below, and on the curve where the colors overlap. Each color patch in these areas should be darker than the previous swatch increment and look like a smooth gradient. The amount of change between swatch increments will be corrected in Linearization. See Linearization for more information.
Typically, the default values provide good results.
Channel |
Select the color channel you want to edit ink split settings for. Only the color channels that have multiple shades of ink on the current printer are listed. |
Light ink peaks at |
The point on the X-axis at which the light ink curve peaks. |
Maximum level of light ink |
The amount of light ink coverage at the peak of the light ink curve. |
Light ink ends at |
The point on the X-axis where the right side of the light ink curve hits its minimum value. |
Minimum level of light ink |
The minimum amount of light ink coverage for the right end of the light ink curve. The light ink curve always starts at the origin. |
Light peak smoothness |
The amount of curve present at the peak of the light ink curve. Enter 0 for a sharp peak. |
Light end smoothness |
The amount of curve present at the point where the right side of the light ink curve hits its minimum value. Enter 0 for a straight line. |
Middle level of dark ink |
The amount of dark ink coverage at the point where the right side of the light ink curve hits its minimum value. |
Dark ink start smoothness |
The amount of curve present at the start of the dark ink curve. Enter 0 for a straight line. |
Dark ink middle smoothness |
The amount of curve present in the middle of the dark ink curve. Enter 0 for a straight line. |
Reset |
Click to restore the ink split settings for the current channel to their previous states. |
Undo |
Click to undo the last change made to the ink split settings. |