![]()
![]()
![]()
![]()
|
|
|
|
|
The Color Mixer dialog box is used to specify and apply color to elements in your design.
To view the Color Mixer, do one of the following:
When you select an object, its fill color is displayed in the swatch button in the upper-left corner of the Color Mixer. When multiple objects are selected, the Color Mixer displays the color of the lowest selected object in the DesignEditor.
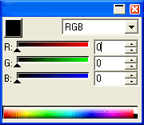
Color Mixer
Use the dropdown list in the upper-right corner of the Color Mixer to specify a color model: RGB, CMYK, LAB, Spot, HSV, or Duotone.
Once you specify which color model to use, there are several ways to specify a color in the mixer:
![]()
![]()
Using the Color Mixer, it is possible to specify colors that are beyond the boundaries of the selected color space. When this happens, a warning icon will appear next to the color swatch, along with a smaller swatch that is actually a functional button.
After you click the button, the color is redefined, and both the icon and the gamut correction button disappear.
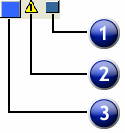
1. Gamut Correction Button |
2. Warning Icon |
3. New Color |
The warning icon only appears when you are viewing objects in RGB, LAB, or HSV color space. The software checks to see if the color you specified can be reproduced accurately in CMYK color space, based on the active printer profile you selected in the Color Settings dialog box.