![]()
![]()
![]()
![]()
|
|
|
|
|
Advanced Settings allows you to set parameters for the engraver. Engraving fills share the same Advanced Settings.
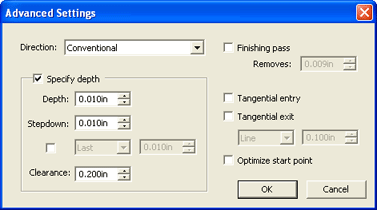
Advanced Settings for Profile, Hatch, and Island Fill |
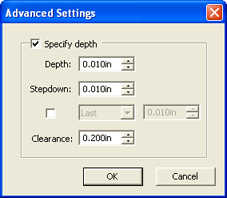
Advanced Settings for Hole Fill |
The Advanced Settings dialog box appears.
Direction |
Selects the direction in which a path will be engraved. Choose the appropriate direction to ensure the smoothest edges. Options are Conventional, Climb, Clockwise, and Counter Clockwise. (See Showing Path Directions for more information.) |
||||||||
|
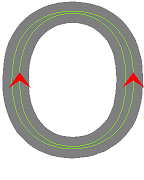
Conventional |
Conventional engraves Inset and Offset tool paths so that parts will have a smooth edge.
|
|||||||
|
|
Conventional Inset |
Conventional Offset |
||||||
|
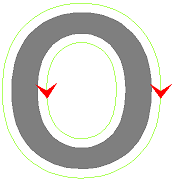
Climb |
Climb engraves in the opposite way from Conventional and is typically used for materials such as heavy-grained wood and aluminum. |
|||||||
|
|
Climb Inset |
Climb Offset |
||||||
|
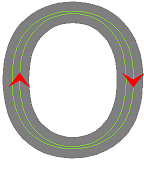
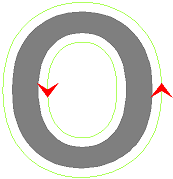
Clockwise |
Clockwise engraves clockwise for all paths. |
|||||||
|
|
Clockwise Inset |
Clockwise Offset |
||||||
|
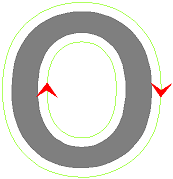
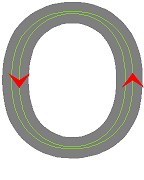
Counter Clockwise |
Counter Clockwise engraves counterclockwise for all paths. |
|||||||
|
|
Counter Clockwise Offset |
Counter Clockwise Inset |
||||||
Specify Depth |
When checked, lets you enter values that will override the engraver settings. |
||||||||
|
Depth |
Specifies the total depth the tool will engrave. |
|||||||
|
Stepdown |
Specifies how deeply the tool will engrave on each pass to ensure that it does not remove too much material. |
|||||||
|
|
Last, First, Both |
Lets you specify additional Stepdown values for Last, First, or Both passes. Lets you specify how deeply you want the tool to engrave on each pass. |
||||||
|
|||||||||
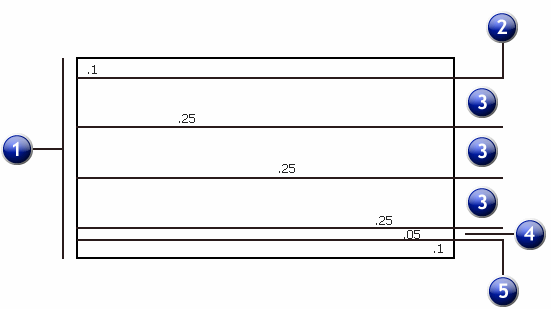
1. Total Depth: 1 in. |
2. First Pass (Optional) |
3. Stepdown |
4. Stepdown Remainder |
5. Last Pass (Optional) |
|||||
|
Clearance |
Specifies the amount of vertical distance the tool lifts between paths. |
|||||||
Finishing Pass |
When checked, executes a final pass that removes a small amount of material to smooth the edges from the previous pass. |
||||||||
|
Removes |
Specifies the amount of material that the Finishing Pass removes. |
|||||||
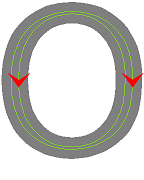
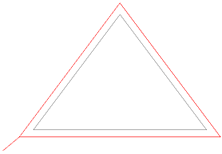
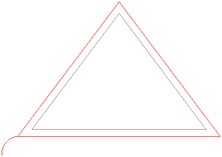
Tangential Entry |
When checked, the tool will begin outside the tool path and move toward the path in an arc or a line. This allows the tool to come up to speed and make a clean entry into the tool path. |
||||||||
|
Tangential Entry, Line |
||||||||
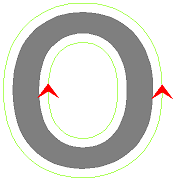
Tangential Exit |
When checked, the tool finishes the job and continues outside the tool path in an arc or a line. This allows the tool to power down and make a clean exit from the tool path. |
||||||||
|
Tangential Exit, Arc |
||||||||
|
Arc |
Employs a curved arc of a specified radius. |
|||||||
|
Line |
Employs a straight line of a specified length. |
|||||||
Optimize start point |
When checked, automatically repositions the start point of each path to reduce the distance from the end point of one path to the start point of the next. Tangential entry and exits will occur at the object's optimized start point. Uncheck this option to use the object's original start point. |
||||||||